1966 Impala
My 1966 Chevy info:
UPDATES!!
Current Specs
History
Pictures
Engine build pics
Build chart
1st motor (bad)
Tech / Misc:
Tech section
Links
Contact Info
![]()
Engine rebuild
My First engine build...
After running the high mileage 350cid low on oil and seizing a rod which broke in 3 places and ripped the piston in half while taken a chunk off the bottom of the cylindar walls I was time for a new engine. I got a new core 350 from a 71 2wd truck reused my heads but put some new seals on so it wouldn't burn 2 quarts of oil per tank of gas. I used Umbrella seals with valve stem seals.
Core: 1971 350cid 4 bolt mains. It was in such good shape I just cleaned it up and honed it out and used the standard bore size for the build up. This core had 4 rods that seized so the crank was toast. I used the crank from my engine that threw a rod it was turned down .020 mains and .030 on the rods. I used a few of the rods from the core and the rest of the rods from my engine for the rebuild. I just tried to match them up best I could, but I never measured rod clearance so I suspect I lose some of my oil pressure to the extra clearance. but the mains and rods came real close to plastigage spec. This assembly was never balanced and as a matter of fact the engine never went to a machine shop not even the heads.
Parts: I got a summit racing rebuild kit that came with 10.9:1 compression ratio hypereutectic dome-top pistons, moly rings, ture roller timing chain, gaskets w/plastigauge, cam main and rod bearings. Summit Racing part number FEM-MHP128-000 I guess there kit is now 10.72:1. I also added a high volume oil pump, and some chrome dress up pieces, and a summit racing 224x234 @ .50 cam w/comp cams matched springs, I figured it to be a decent starting cam to hop up performance a bit but still keep the engine well manered. This was all topped off with an edlebrock Performer RPM intake and my Q-jet carb. Accel billetproof magnitic pickups distributor w/supercoil.
The Build: When I got my parts I tore into it, scraped the top of the head surfaces of any gastket material or grime, sprayed degreaser all over it and presure washed it with more degreaser and high pressure soap and water in a buggy bath car wash, honed the cylindars, and it was pretty much ready for parts, a quick shot of WD40 to prevent rust since it was pretty humid. I started with borrowing a cam bearing installer got my bearings installed perfect even verified with a piece of wire the oil holes aligned. Crank was ploped down on the bearing halfs with some white lithum grease pre lube, then the main caps when on with a plasigauge in each. only one main I think it was #2 from the front of the block I replasigauged with 4ft lbs more torque and it was in spec. I had a friend press in the rist pins for the piston to rod assembly and in went the pistons, using a piston ring compressor that tightens around the pistons and slides off as the piston is tapped in with a rubber mallet. After about the first 4 pistons It was getting so hard to turn the engine over that I had to use a long wretch with breaker bar on the stock crank damper to get the engine aligned for the other pistons. K with the pistons in the cam was next, soaked it up with break-in lube and in it went with no problems. I installed my High volume oil pump and got it posistioned just right and rolled the motor back to the top side with my nifty engine stand so I could lubed up the lifters to drop in and get ready for sealing up the motor. I put the on Comp cams matched springs that where matched with my cam by summit and made sure my valves where seated properly and checked the clearances of everything to make sure it would support the .488 max lift of the cam with my stock 1.5 ratio stamped steel rockers. On went the heads with the stock pushrods, rockers, valves etc. Got the heads bolted down with the same bolts that held them down before but with a milodon dead soft copper head gasket smashed between deck and heads to help control the compression I was planning on. I put the stock oil pan back on and touched it with some extra paint I had laying around and it was read for installing into the impala.
Installation: With my 1966 Impalas engine bay presure washed I figured it was ready for the motor, but heres where I got to excited about getting the motor running, I should have spent alot more time and compleatly cleaned and painted the engine bay for the motor, word of advice paint your engine bay the way you want it before the motor goes in so you dont have to take your motor out in the future to paint the engine bay in detail. Well anyway I struggled with splining my driveshaft with my transmission at the same time as tring to lift it on the cross member. I look back now and wander why I didn't just undo the 4 bolts at the rear end and take the driveshaft off, but then again this was my first major experience with this level or work on a car. Once the trans was in place and bolts finger tight on the mount I lowered the engine down and after an hour or two was tightening the trans bolts and engine mounts. I bolted on my stock manifolds with the still stock 2inch singal exaust, my stock GM starter, alternator and on went the intake and carb then my points style distributor (I put a drill to the oil pump to presureize the system with freash oil before the distrib when in) and started bumping the starter over to adjust my rockers. This is where I started wandering how the motor was even going to start as the starter would strain to even kick the engine over I had to hit the starter several times to get it to move an inch but I kinda passed it off as a low battery for now. With the rockers adjusted plug wires hooked up battery charged I tryed to start the engine for the first time.
The Problems: Well as you might have guessed, the engine didn't start, as a matter of fact the engine still turned slowly, to slowly to prolly start, and after trying for a few hours, I went and bought a new battery, The biggest one the auto parts store had on there shelf. It was a 1150 cold cranking amp RV battery, talk about a heavy sucker, it was still close in size to the battery I had just alot denser. With this battery ploped in the engine turned over fairly nicely but you could still hear the starter straining against the tight motor. IT STILL would not start... I kept playing with the timing and dwell and verified I was getting fuel and spark etc. The spark was very weak looking, So off the the parts store, I picked up the accel replacement points and had that installed in no time. Got the timing lined up and went for the next round in starting, still wouldn't start, and by this time all this cranking trying to get the engine started killed the starter, it would barely turn the engine over again even after I put the charger on the battery. So off to the junk yard for a new starter $25 bucks and an hour later the new starter was in. You would think with spark air and fuel you should get at least a small hint that the engine wanted to run with the timing where it should be. Nope... I was defeated, I left that day with the battery on charge into the house I went and started rethinking everything. In my frustrations I broke down and called summit racing, and after talking with them for a bit I had me an Accel billetproff electronic distributor and coil ordered. Waited a few days which took forever from my distrib to arrive, got it and immediatly had it installed. Next round of cranking still yeilding no returns of joy. Started calling everyone I knew and auto parts stores picking there brains for anything to help me out and a little later that day my friend comes over to help me out, he when over everything I did and was a little shocked about how tight the motor turned over. After he looked around and tried cranking for a bit he came to the conclusion the motor still wasn't turning fast enough to start the motor, so we pulled out my nearly toast battery and worked our magic, we had the ignition running on 12volts and the starter hooked to 24 volts. Guess what... It didn't even crank over once and we had a crackling motor with a small back fire though the carb. Truns out the motor wasn't spinning over fast enough to do any good and the distrib was off once tooth when I put the new distrib in.
Break-in: Now that the engine would start we got it dialed in and started the break in, making sure it was staying oiled and not to hot which it did get pretty hot but by then it was shutdown time. Changed the oil and the motor was done, for now. Well as it turns out within the first 500 miles of my break in period my nice summit cam went flat, I didn't even have the change to feel the power of the engine before it went flat. I had a problem with the rockers comming loose on me and even broke a rocker. So I ordered some 1.6 ratio stamped steel rockers from summit and a friend had an RV stage 2 cam that he hadn't used yet, So I installed both the cam and rockers I also reused my old stock lifters even after everyone told me you cant reuse lifters.
Engine as of now: I have 4500 miles on the engine with the RV cam and stock lifters, my stock chevy heads are starting to come apart, with the tough springs still installed and the RV stage2 cam total lift with 1.6 ratio rockers is .443 intake and .448 exaust which is pulling the rocker studs out of the block and making my rockers come lose all the time. I figured the heads are pretty much ending there life on my engine so while I save money for my AFR heads I pulled the rocker nuts up to the top of the stud and started pounding on em with a hammer, sure enough they went back down, did this to 5 studs and I still drive the car on the weekends, I just be keeping the engine below redline now. I have since added an edelbrock Street pump (mechanical) and holley 3310-4 750cfm vacuum secondary carb that I got on Ebay.com for $98 bucks, best performance mod I done yet, noticable power increase. I just installed my headers, Dynomax Cermaic coated 1-5/8s with 3 inch collectors to an X pipe and reduced to 2.5 inch duals into 40 series mufflers and out the back. This was yet another great improvement. Once I get my new heads this engine will be great. I had also swaped my powerglide with a TH400 tranny and 2800rpm stall converter. With few problems I think my first engine build went very well, atlest the engine held together though all the abuse I have put it through.
Some Pics:
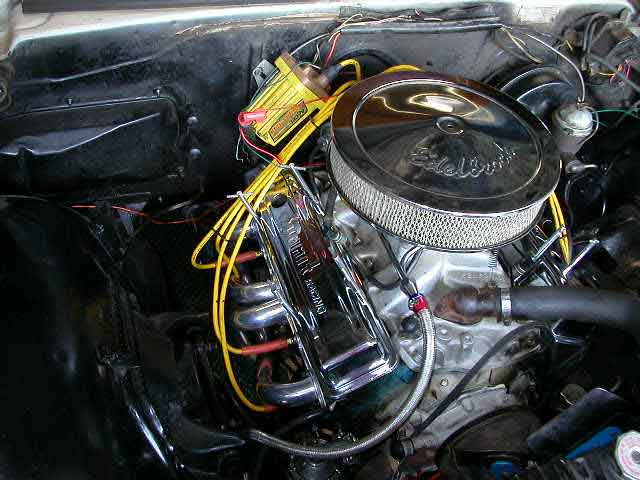
Front of Engine
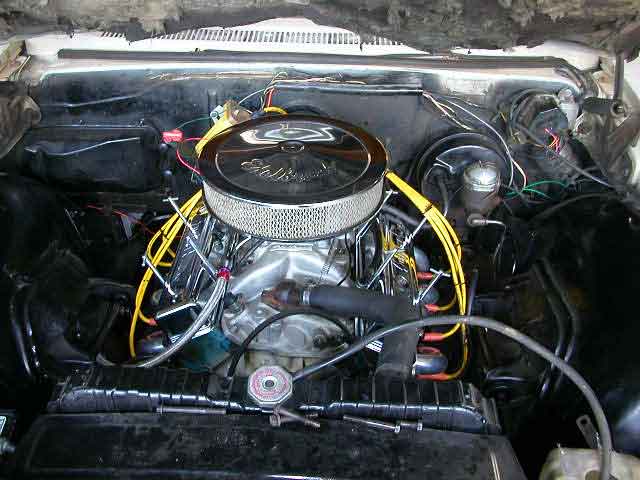
Driver side shot, I still have the alternator off waiting
for my new alternator bracket from summit, was on back order.
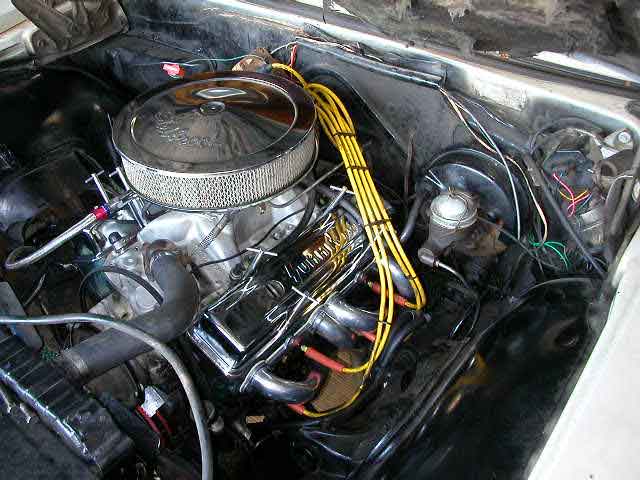
And a shot of the Passenger side, now that I got my Accel plug wires
I am gonna relocate the coil a bit farther out to make it look neater,
and I am going to start cleaning up the wires and other mess in the
engine bay.